Selasa, 25 Agustus 2015

Tips of the Trade: Kitchen Styling

 photo IMG_0276.jpg

A big kitchen with a lot of counter space can present a styling challenge. Too many things and the space will look cluttered quickly, but not enough accessories in a big space looks sparse and unfinished. It's a fine line! 

 photo IMG_0174.jpg

 photo IMG_0030.jpg

For the most part, I like countertops to be pretty clear but I think it's fun to add color and layers to open shelving. We had some extra quartzite from the counters in my parents kitchen and decided to use it for the open shelves in the dead space above the sink. When it was time to get my parent's more settled in their new kitchen, I brought up a ton of accessories to play with and we also used a lot of family heirlooms that my mom has had for years.

 photo IMG_0750_2.jpg

Sometimes an empty shelf can feel like the most daunting thing. Where to start with the styling?? I have listed out the most basic of steps below, but I will say that one helpful tip is to know your shelf height before you start collecting styling items. You obviously don't want items that are too tall to fit, but also be careful to not have too many too-small accessories. Sure, you can stack items to create height, but you want there to be several hero pieces that fill at least 2/3 of the height of your shelves. Paying attention to scale this way helps keep the shelves from getting too busy.

 photo IMG_0759.jpg

Big, white dishes are the perfect foundation pieces for kitchen shelf styling. I like a few oversized platters (these are from Target and Homegoods), a cake plate or two and a stack of mixing bowls.

 photo IMG_0761_2.jpg

After the big white pieces, I like to add in a few colorful, larger items, like a ginger jar, a flow blue platter and this special Lynne Millar painting I had framed in a pretty burlwood.

 photo IMG_0766_2.jpg

The next step is to fill in the layers with neutral pieces in interesting shapes. This helps things to not get too crazy with color. I added a vintage fluted bowl and a stack of my great grandmother's off-white wedding china here.

 photo IMG_0768 1.jpg

Then we added a few smaller items - like marble candle holders and pink tapers, a little blue and white sugar bowl, and a pair of silver salt and pepper shakers. And we added the counter top accessories too. Bread boards are always a great idea (and look so pretty against stone counters) and a little bit of greenery is perfect for every room, including kitchens and bathrooms.

     photo IMG_0253 1.jpg  

 photo IMG_0063.jpg

  photo IMG_0049.jpg   photo IMG_0036.jpg    

The best part of all is everything can be changed around easily! One of my favorite post-Sunday-dinner-clean-up activities is a good kitchen styling session! :) Here are some of my go-to pieces:

Mercer PlatterBone China Platter
Mixing Bowl,  CB2 Basket Bowl, Marble Cake Stands
Blue Tea Container, Jade Beater Bowl, Lynne Millar- Yellow Rose 1
Marble Salt and Pepper, Salt Cellar, Wood Candlesticks
Heritage Bread Board,  Iona Cheese Boards
Linen Market Dishtowels, Morandi Pitcher
What am I missing in this list? Do you have a favorite oversized white platter or bread board source?

Senin, 17 Agustus 2015

Our New Playhouse

 photo IMG_1111.jpg

If you ask our girls what they miss the most about NYC, our old playhouse in Brooklyn will most definitely get a mention. It's been discussed MANY times in the past two years since we've moved - also the fact that we promised to build the girls a new one and hadn't yet followed through on that. (Whoops!) They had done what we asked them to do and earned their part of the playhouse with extra chores all summer long, so Michael and I decided to tackle building it this month so they could enjoy it a little bit before school starts.

 photo IMG_1312.jpg

There are Amish playhouse kits that you can buy sort of piece meal depending on how customized you want your playhouse to be. We bought a bare bones version both for aesthetics and to help save on costs. We had to pick up a lot of our own materials this way, but I liked getting to choose the finishes!

 photo IMG_1215.jpg

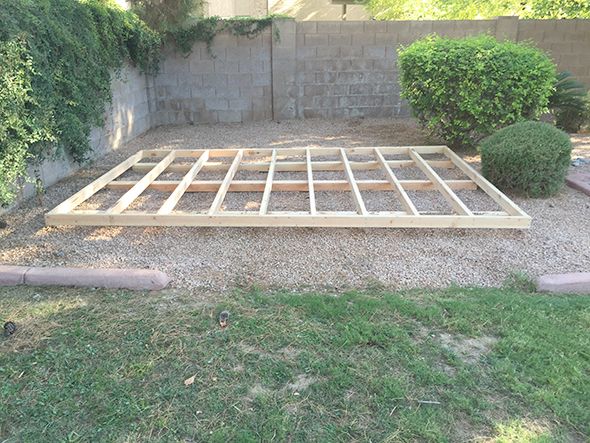
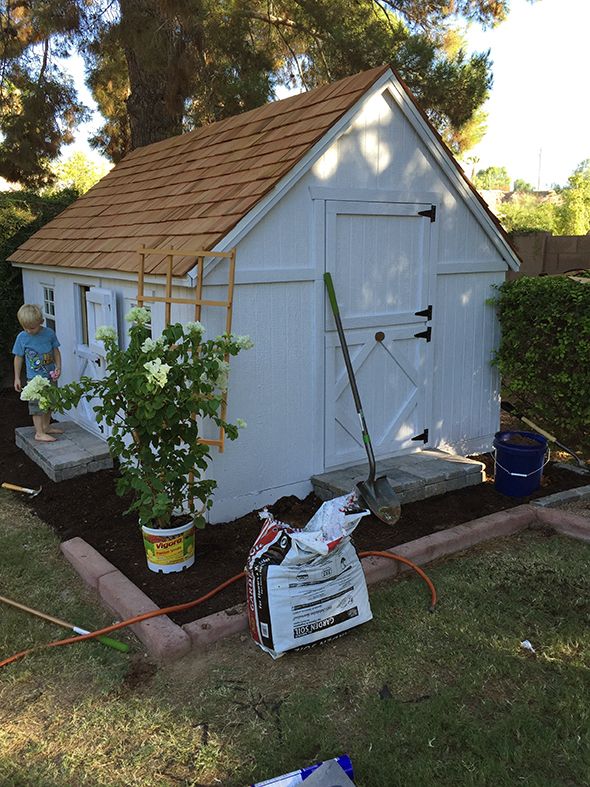
We started by building the base out of 2x4s and 4x4s in a graveled area in our backyard. It had always been this strange little spot that we didn't ever use or really know what to do with. I think maybe the previous owners parked an extra vehicle here or something since it's not that far away from an RV gate? Not sure. But it worked perfectly as a spot for our playhouse since it's close to the swing set, but away from the sprinklers.

 photo IMG_1662.jpg

Once the base of the playhouse was built, we made floors out of 1/4" plywood cut down to 8" strips (a thinner version of just what I did to make floors in the studio).

 photo IMG_1673.jpg

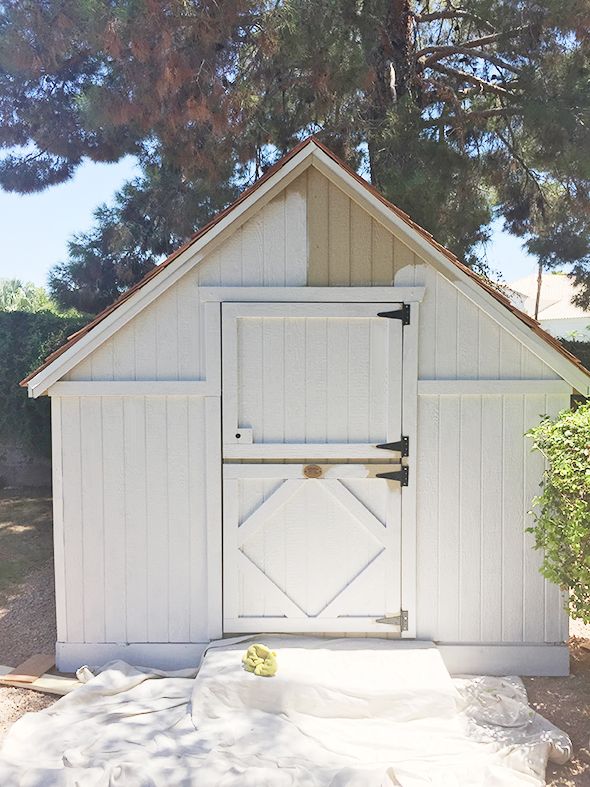
The walls of the house went up quickly (this is the bulk of what comes in the "kit"). The trusses and the roof took a little more work to get right. (I really wish we would have thought to pull out that rosemary bush in front of the big door beforehand! It was a pain to work around!)

 photo IMG_1768.jpg

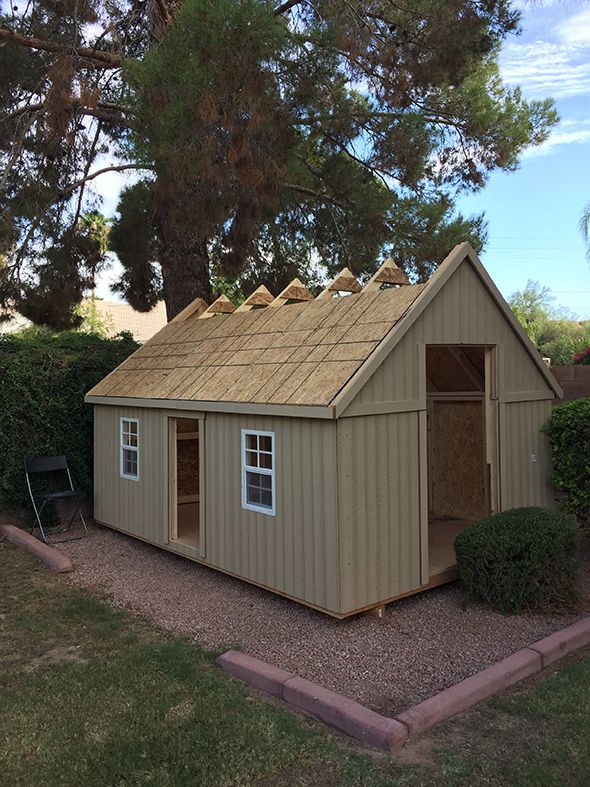
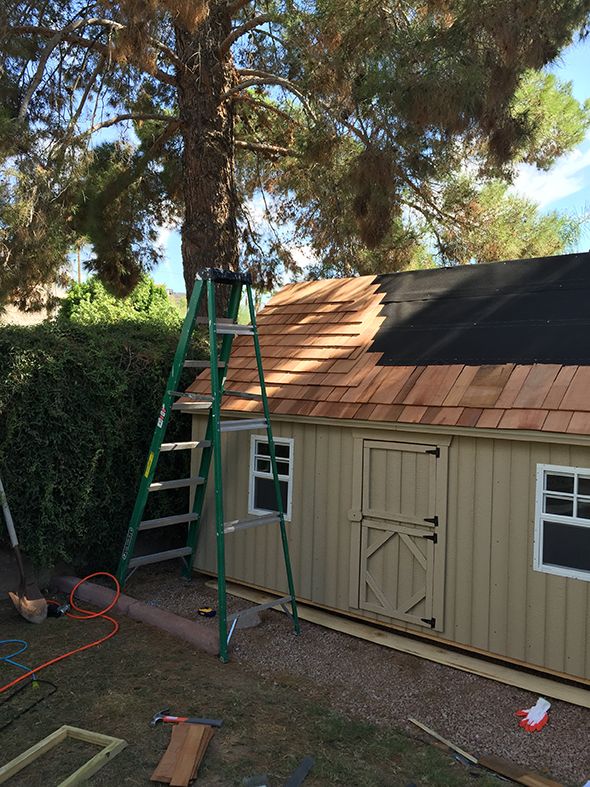
Once we put on the felt paper for the roof, things started to feel real and exciting and the momentum really picked up! Pretty sure the girls were squealing at this point. :)

 photo IMG_1799.jpg

 photo IMG_1802.jpg

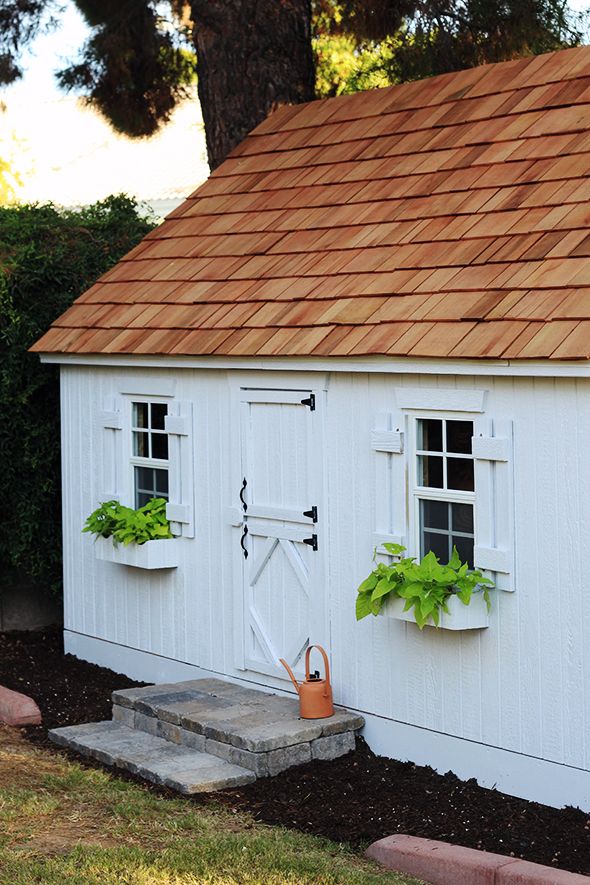
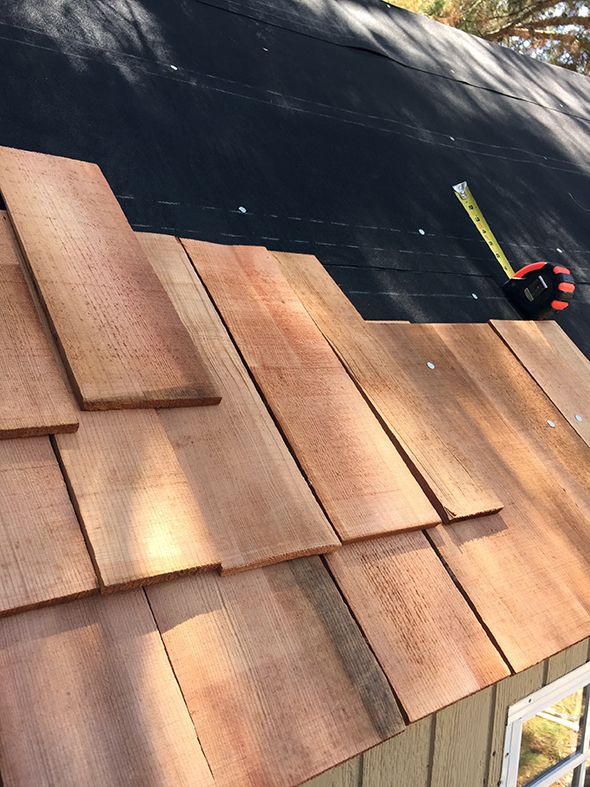
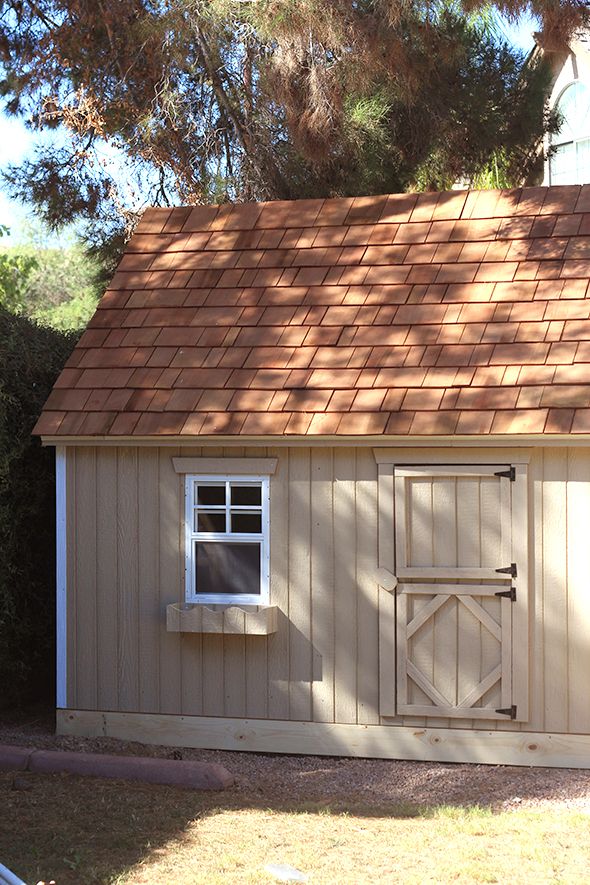
I didn't want to just do asphalt shingles and actually went to a roofing supplier looking for a metal roof option so I could get that modern farmhouse style. But the price and convenience and look of the cedar shingles won me over in the end!

 photo IMG_1770.jpg

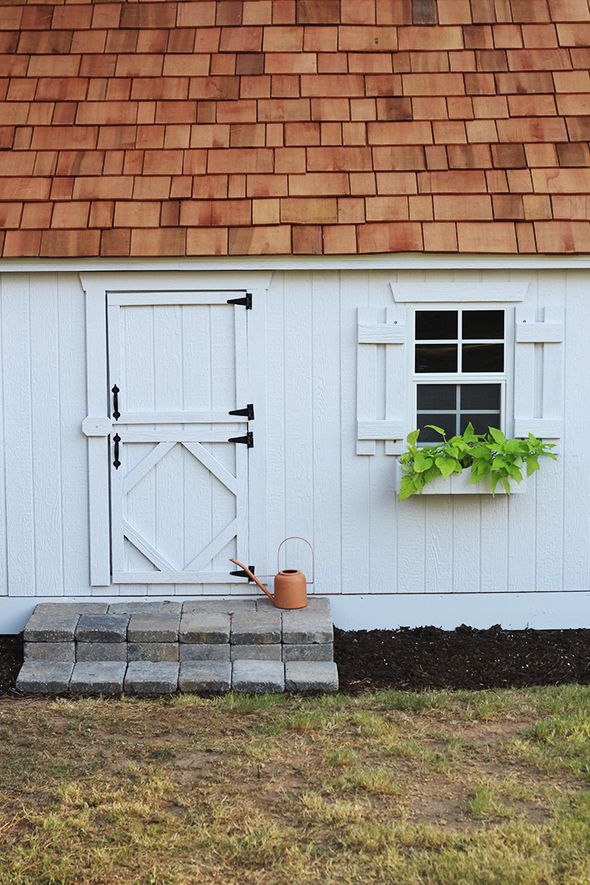
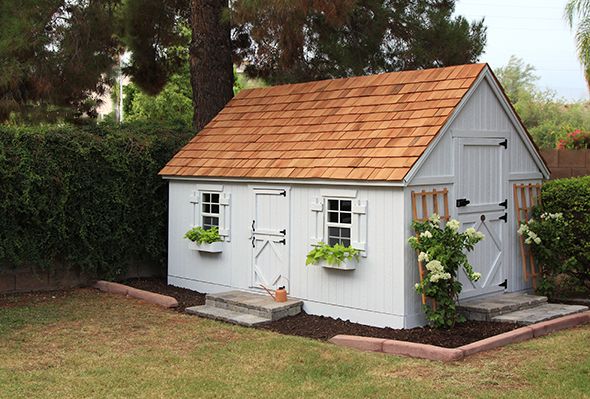
So now we're going for a cape-meets-farmhouse-in-the-desert look. ;)

 photo IMG_1836.jpg

 photo IMG_1839.jpg

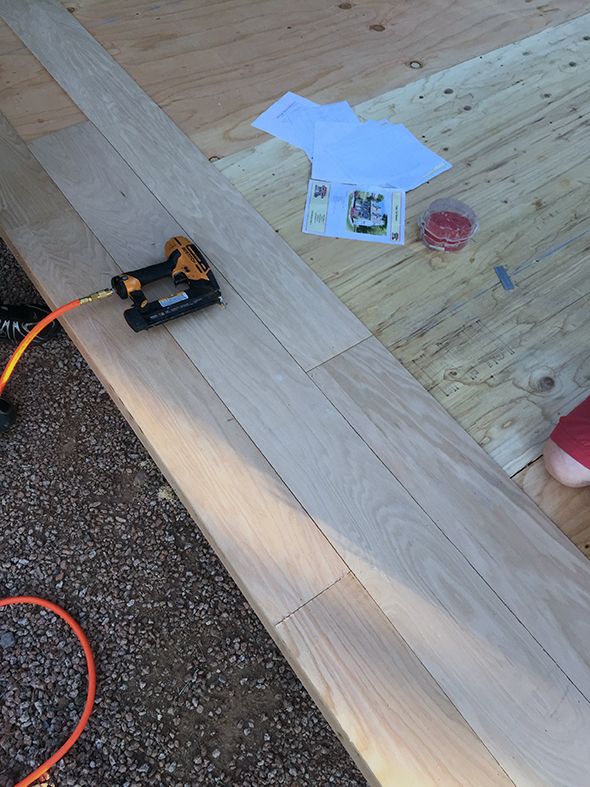
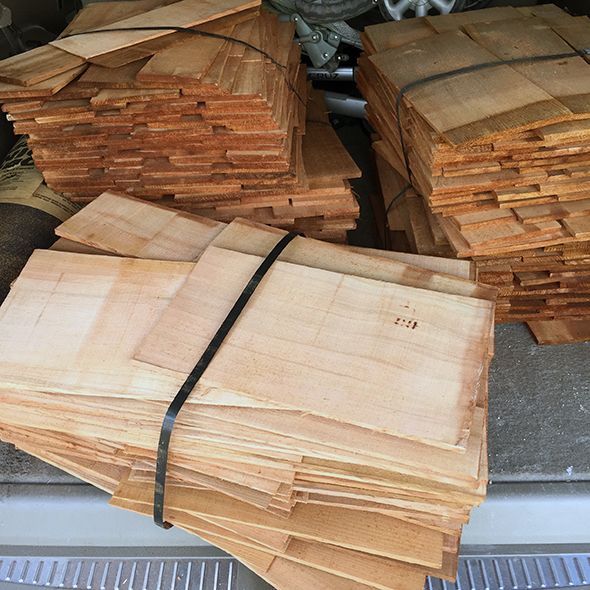
I put on the cedar shingles over the course of two mornings (with a big thanks to Heather for holding the ladder while I hung the top few rows!) using our pneumatic staple gun. It wasn't too bad installing each shingle individually, just a little slow-going. I think it was totally worth it in the end. We paid a little more for the cedar shake shingles than asphalt, but it wasn't as expensive as the original metal roof idea was. And I think, while I love metal roofs on houses, the metal would have made the playhouse look like a shed. Not good!

 photo IMG_1102.jpg

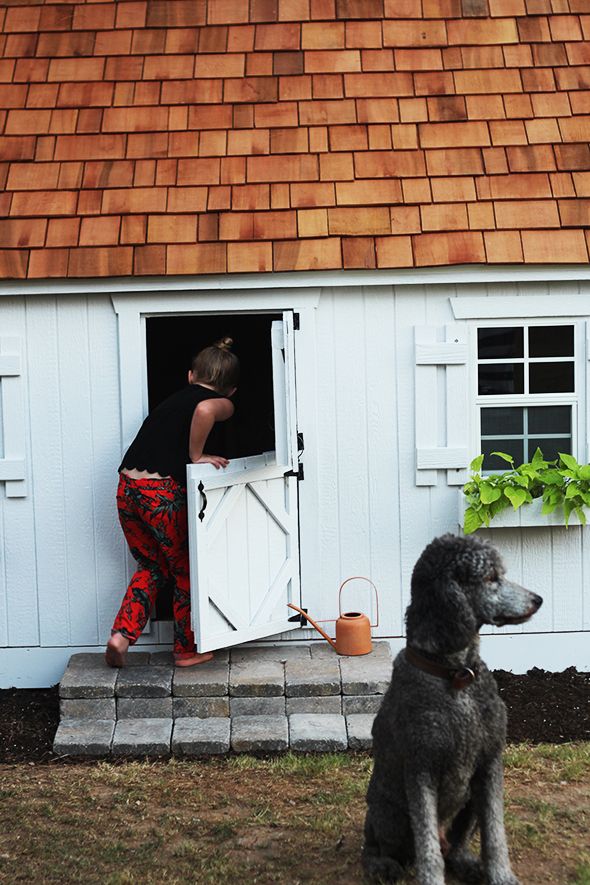
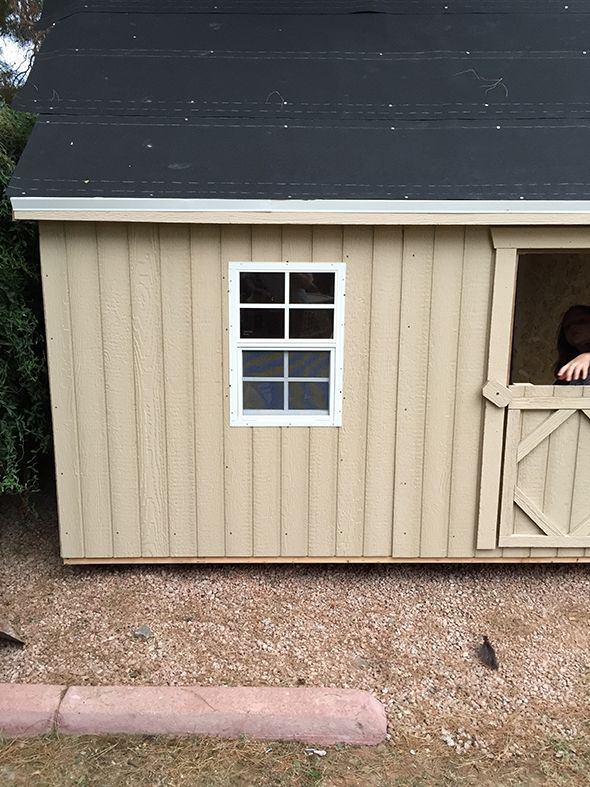
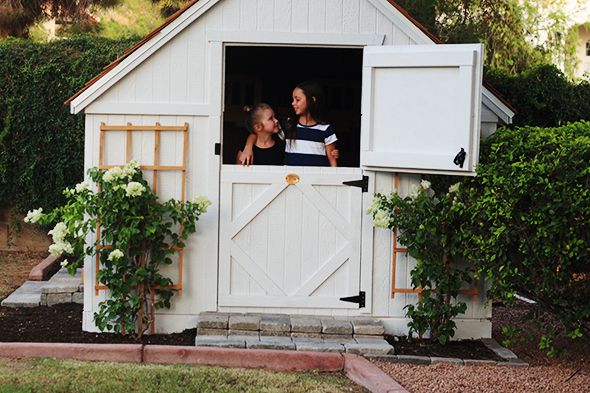
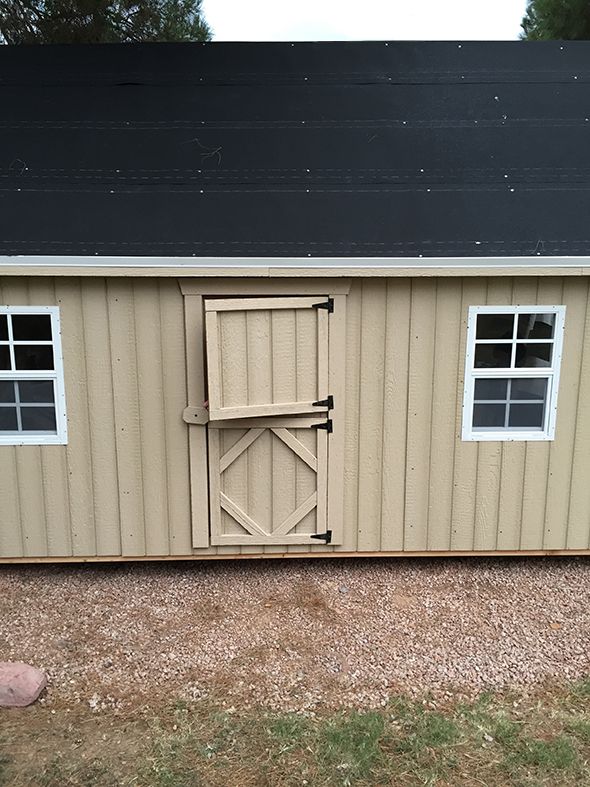
As you can see, the playhouse gets a good amount of hot Arizona sun during the day, so I wanted to make sure to use a good exterior paint on the outside of the playhouse. I've been working with BEHR on their interior paints (a big 
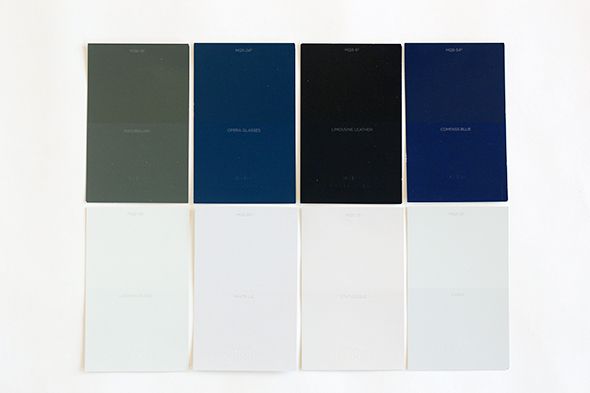
how to paint interior rooms post here, in case you missed it!), and I was excited to get to try their Marquee line for this project. It's a great paint with great coverage, in the prettiest colors. I knew I wanted to go with a warm white on the main part of the house, but I thought about doing an accent color on the door and trim. There were a few incredible navy options that were really tempting me!

 photo IMG_1073.jpg
Colors from top left, going clockwise: Naturalism, Opera Glasses, Limousine Leather, Compass Blue, Curio, Statuesque, White Lie, Looking Glass (side note: aren't those great color names!?)

 photo IMG_1087.jpg

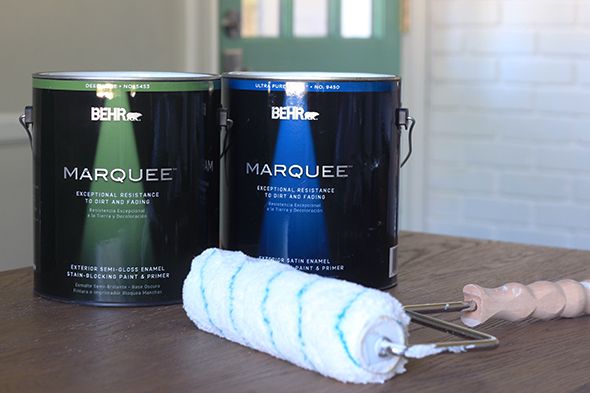
I decided to go with 
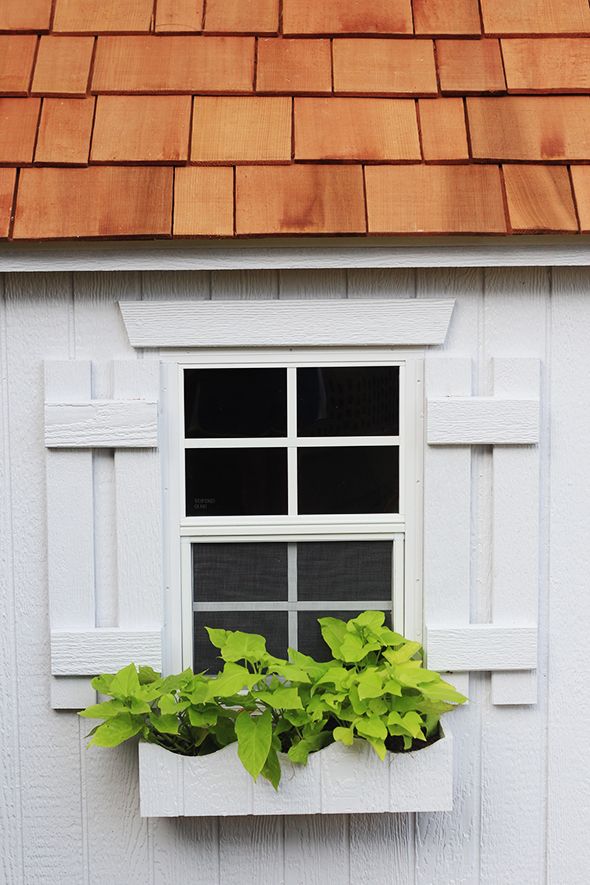
'White Lie' (MQ3-55) for the body of the house. True to BEHR's promise, the Marquee exterior paint covered the old bad tan in just one coat!

 photo IMG_18733.jpg

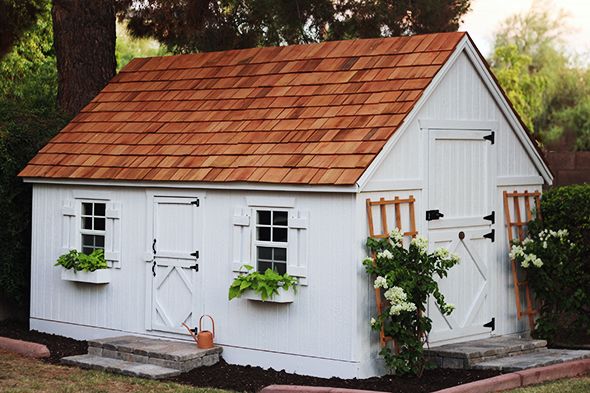
I loved the all-white look so much, that I decided to hold off on an accent color for the doors and trim. I think it looks a little more modern this way, though it's easy to go pick up a quart of paint in an accent color if we decide to ever go that route!

 photo IMG_1112.jpg

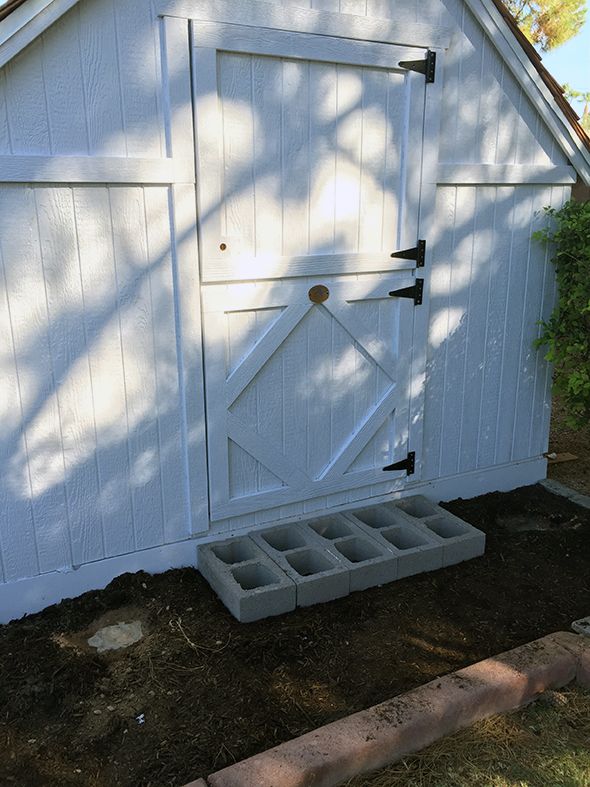
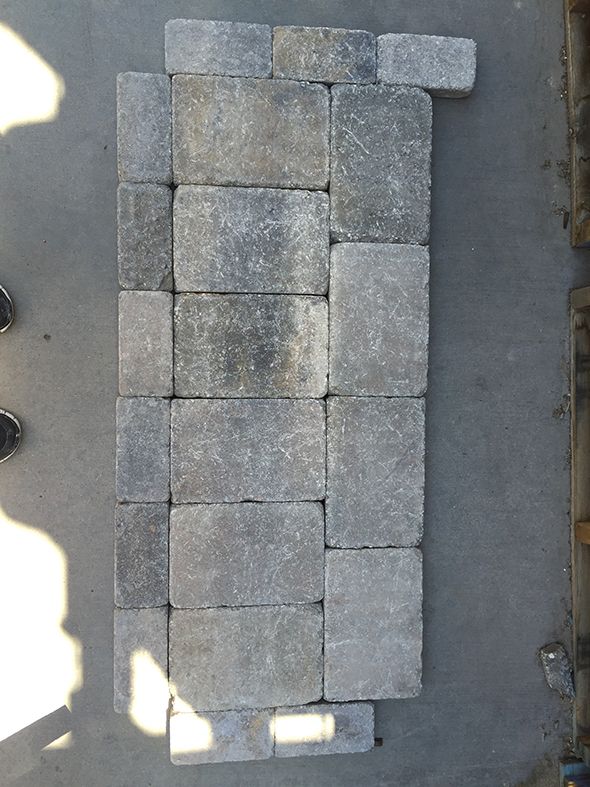
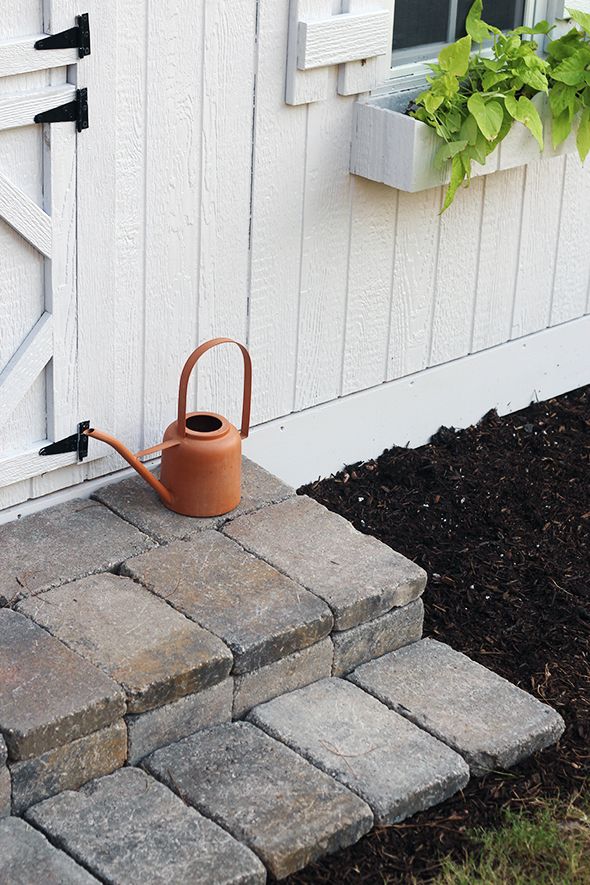
While the paint dried, I went to Home Depot and picked up some cinder blocks and pavers to make little stone steps and to curb out the new mulch we laid down after raking out the gravel.

 photo IMG_1890.jpg

 photo IMG_1826.jpg

I used cement glue to attach the pavers to the cinder block.

 photo IMG_1904.jpg

 photo IMG_1152.jpg

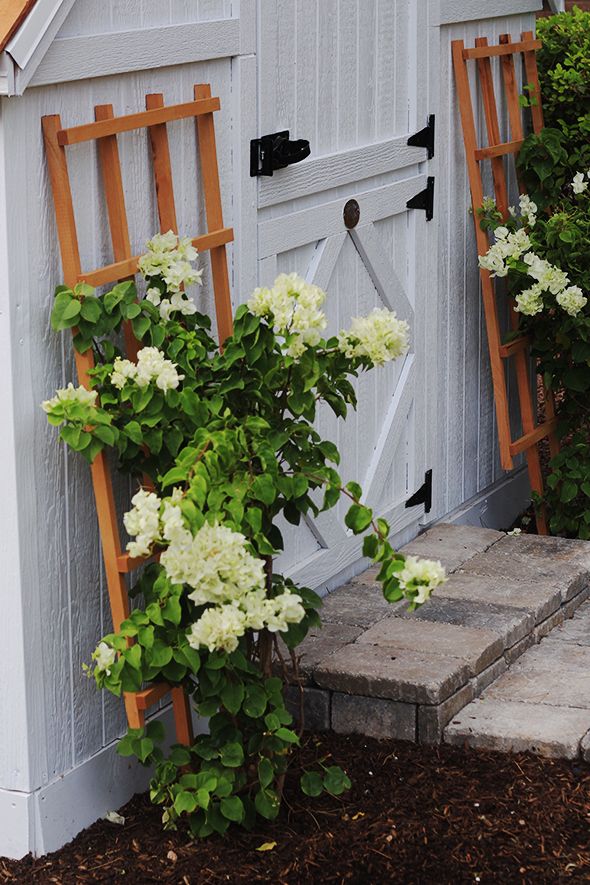
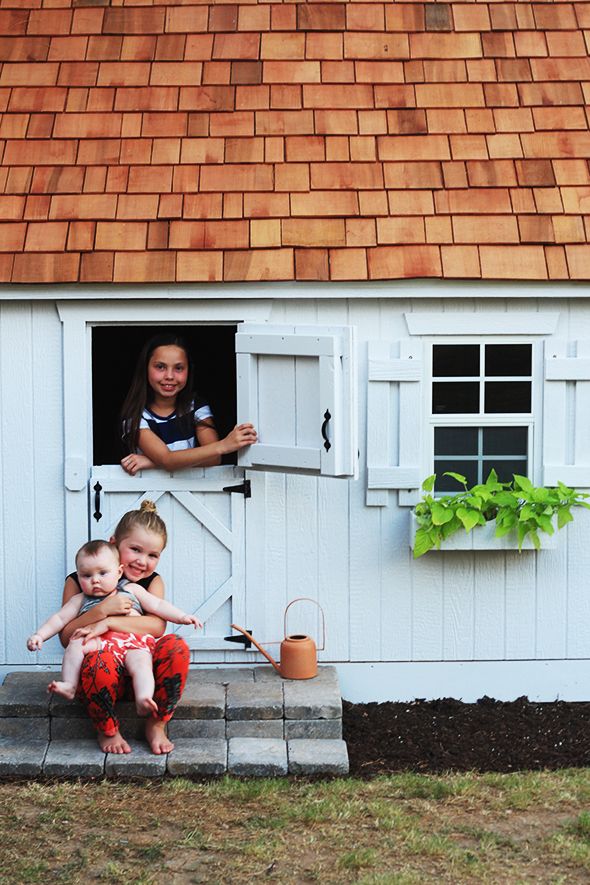
And then we added two trellises and white bougainvilleas to the side.  

 photo IMG_1914.jpg

Bougainvillea in any color will always be a favorite of mine! The big blooms are so happy and the plants do so well in the heat here.

 photo IMG_1404.jpg

 photo IMG_1248.jpg

 photo IMG_1381.jpg

The girls helped me plant a few sweet potato vines in the planter boxes. I love their bright green color and they also do well in full sun.

 photo IMG_1402.jpg

I think they're so pretty against the clean white paint color!

 photo IMG_1384.jpg

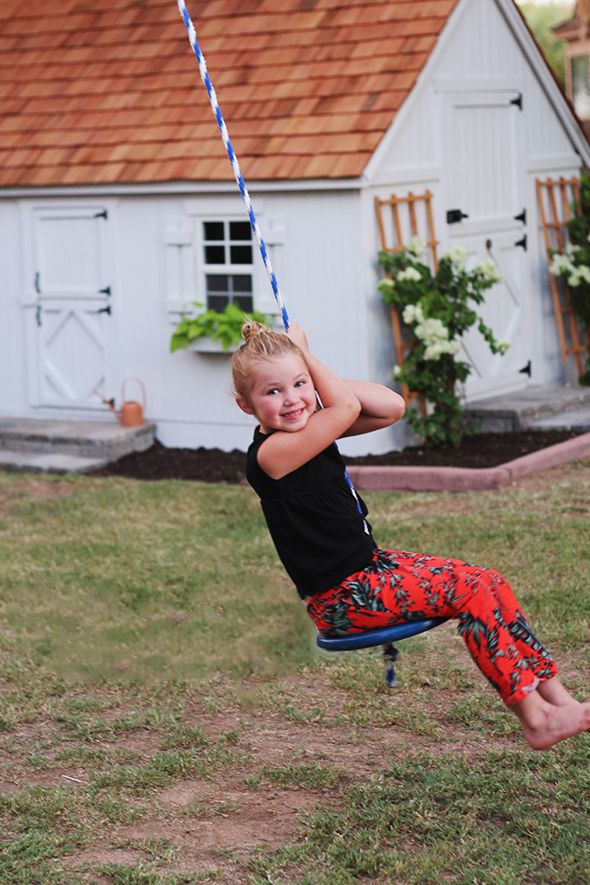
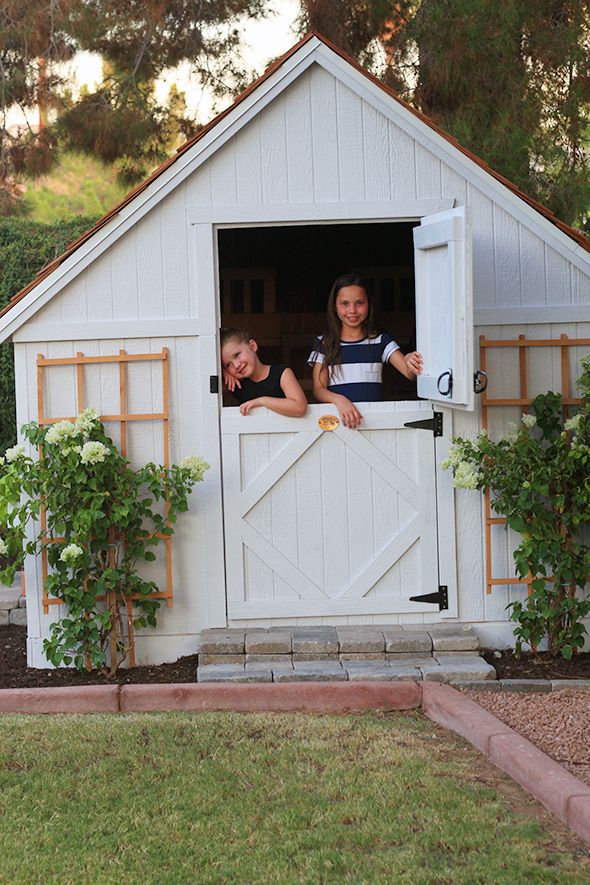
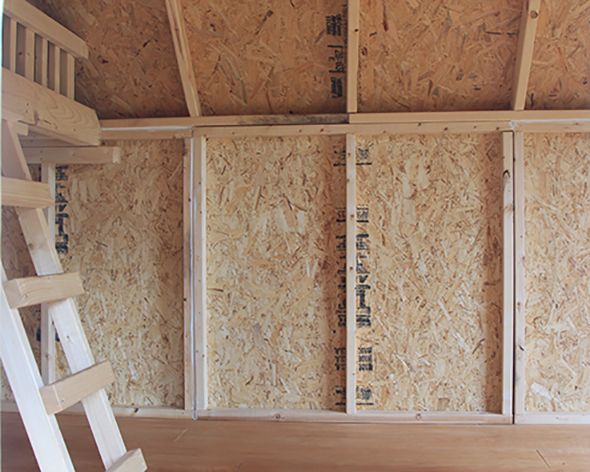
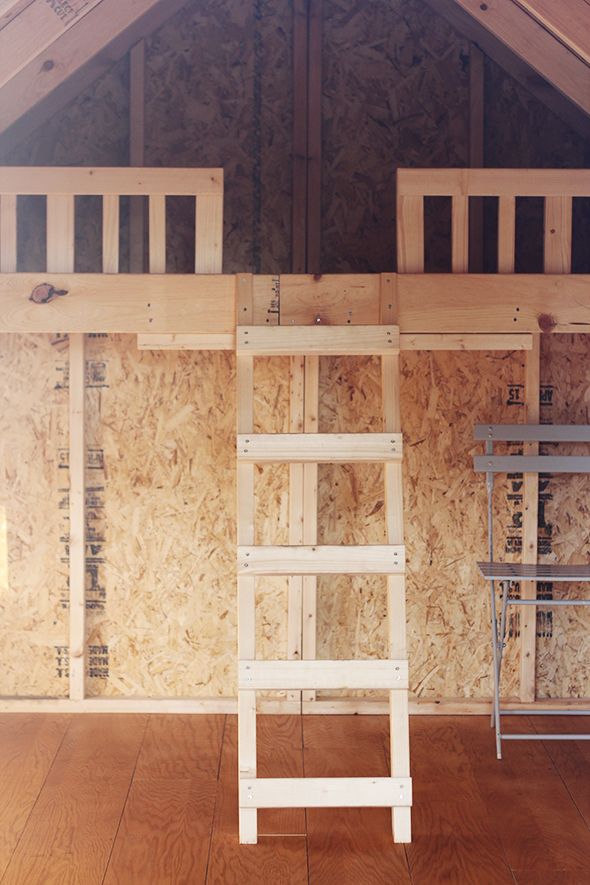
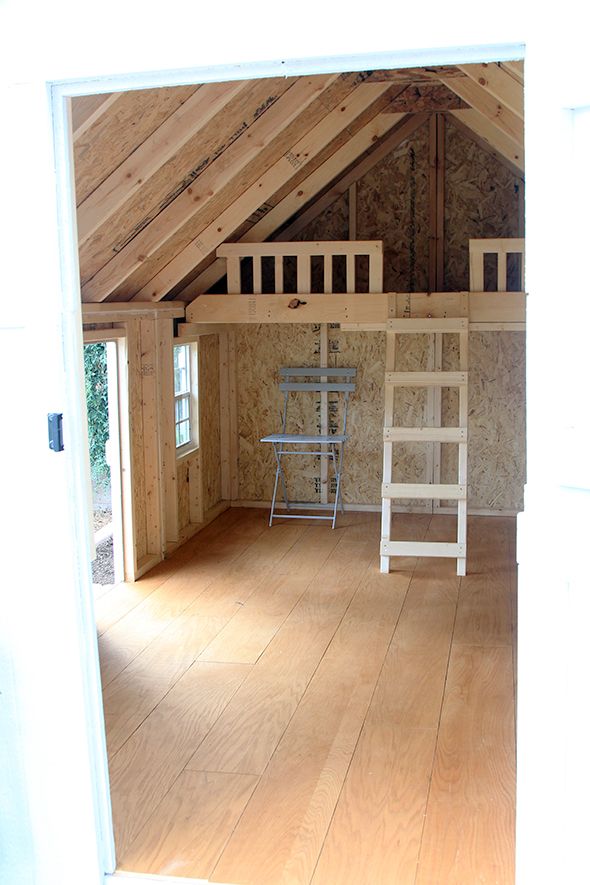
The inside of the playhouse is small, but still bigger than our last one - perfect for our growing girls.

 photo IMG_1398 1.jpg

My designer-mommy heart has been bursting with pride, watching them draw up floor plans and pick paint samples and fabric for little cafe curtains. Though I'm not so sure I'll be giving them sign-off on horse wallpaper and pink floors. :)

 photo IMG_1161.jpg

I'd like to just paint everything in here white (same color and paint as the Marquee on the outside), so that it looks brighter inside. We'll see if I can convince the girls to be satisfied with some horse art and maybe a painted-on pink rug or something. :)

 photo IMG_1393 1.jpg

I am SO glad we decided to build this playhouse! Before we started, I was really intimidated by the idea of doing this without professional help, and initially I wanted to hire a handy man, but Michael told me he thought we could handle it and that he really wanted the girls to see us building it for them, so I got over it. Some of my favorite childhood memories were spent in the tree house and the playhouses my dad and mom built for me and my brothers and sisters at the different places we lived growing up. I remember my parents working hard for us and feeling like it was SO cool that they could do tough things.

 photo IMG_1234.jpg

I feel like this was such a success and I've been giving us major pats on the back all week. It WAS hard, but we did it! And we had fun doing it. And I know we'll be loving and using this playhouse for so many years to come. :)

 photo IMG_1253.jpg

 photo IMG_1318.jpg


This post is brought to you by BEHR. Color that's True to Hue. If you feel it you can find it. Visit truetohue.behr.com

Jumat, 14 Agustus 2015

On Getting Motivated

School started for my big girls this week. It felt like such a sneak attack! I'm having to play catch up a little this weekend to get organized and settled on the home front so we're all set for the new schedule.

This year's been amazingly challenging. Not in a hard or sad way. I feel so happy/blessed/lucky and oddly peaceful considering all the balls I'm juggling now. But sometimes during the particularly stressful weeks, the feeling of being overwhelmed will start to creep up on me and I've had to do everything I can to squash the emotion before it can start to take shape and kill my motivation. Isn't motivation a funny mind game? One second I can be laying in bed in the morning, checking my emails on my phone, getting overwhelmed a little, and then proceed to make a million excuses for myself on why I should just call it in for the day (not a great feeling for 6 am). And then I'll check Instagram and see something beautiful and new to me, or someone doing what they do well, with heart and passion, and suddenly I'm ready to hop out of bed and tackle my to do list with a vengeance!

 photo happy weekend.jpg
(Michael knows that any time I'm putting on shoes that tie, I mean business and stuff is going to get DONE! That usually means I'm wearing sneakers, but these cute sandals have a tie on them, and they're crazy comfortable, so they count!)

What inspires you to get through the stressful days? I'll admit it - sometimes I bribe myself with a little present. Like, if I buy myself a new candle, I'll be about ten times more likely to give the house a good cleaning/organizing session. If I'm wearing new shoes, I'll be more excited to go to the slab yard for the 20th time this week.

 photo WEEKEND LGN.jpg
candle (this one is amazing too!)  //  suede Vans  //   copper-handled baskets   

I'm already set for the weekend because I got a pretty fiddle leaf at Home Depot this week for only $37 and I found two of the West Elm bullet planter bases at an outlet place here called DownEast Home for about $25! Super score. I want to plant the fig tree in the bigger size base up in the studio, but I need to find a planter that fits the stand first.

 photo LGN FIGLEAF.jpg

What are you up to this weekend? Besides all the cleaning and organizing, we are finishing up a playhouse Michael and I have been building for the girls here and there over the past couple of weeks. Can't wait to share! xo

Kamis, 13 Agustus 2015