Kamis, 30 Juli 2015

DIY Faux Marble

I love it when readers share their home projects with me! Recently Yael emailed me a link to her post on faux marbling. I loved how she used resin as a top layer - I felt like that really made the countertop look like stone!

 photo IMG_0731 copy.jpg

We needed a new top for the vintage credenza for Ali's house and this faux marble idea seemed like the perfect, super inexpensive solution!


 photo IMG_1393.jpg

 photo IMG_1398.jpg

 photo IMG_1495.jpg

I removed the old, beat up top and had a piece of 3/4" MDF cut to the same size and painted it with white zinsser primer.

 photo IMG_1392.jpg

Then I collected my supplies based on Yael's tutorial and this post from Gorgeous Shiny Things.

 photo IMG_0590.jpg

sea sponge  //  artist's brushes  //  mixing containers and paint stirrers  //  feathering brush  //
  feather  //  clear latex glaze  //  resin

 photo IMG_1425.jpg

You'll only need two paint colors for this project: black and white. You can mix in little bits of blue or brown to cool or warm up the gray if you want. Use the containers to mix up small batches of different shades of gray. You could just do this on a paper plate if you wanted and if you're doing a small surface like mine.

 photo IMG_1427.jpg

Next you'll want to cut your sea sponge down to a small piece and sponge on really loose veins. It's a good idea to reference a couple of photos of marble on google images to help you understanding what real marble looks like. Something I noticed is that veins branch off from each other and usually don't ever cross paths or create an X. 

 photo IMG_1445.jpg

You just sort of get into a rhythm of sponging on different colors and tones of the gray mixture and then feather the edges with your big soft brush.

 photo IMG_1450.jpg

Then you use an artist's brush to drag in solid veins. I learned the the veins should be less curvy and more jagged. It's also best to pull and twist the brush toward you. Also, don't forget to continue the vein down over the edge.

 photo IMG_1453.jpg

After a while of playing with it, a marble-like pattern will (hopefully!) start to emerge. It's a good idea to leave it and come back to it a few times, but don't overwork the paint either. I probably should have stopped a little earlier, but I still like the end result.

 photo IMG_1462.jpg

The real secret is using a coat of resin on top of the faux marble painting. 

 photo IMG_1470.jpg

Like with any epoxy, you just mix the two bottles together and then spread quickly before the epoxy hardens.

 photo IMG_1473.jpg

You can use a plastic spatula to spread the epoxy, but I just used a paint stirrer. I used an entire quart here.

 photo IMG_1484.jpg

 photo IMG_1492.jpg

After a few hours, the resin will be dry to the touch and fully cured within two days. It's a really cool product!

 photo IMG_0792.jpg

I love how this one turned out. I think the resin really takes the look to the next level. 

 photo IMG_0731.jpg

It's not perfectly perfect (I think it gets better with some practice), but you just can't beat the price of a little paint on a scrap piece of MDF! :)

 photo IMG_0768.jpg

 photo IMG_1536.jpg

If you have a project you would like to share on LGN, please email me a link! I would love to see your work! And thanks again to Yael! xo

Senin, 27 Juli 2015

DIY Lucite Frame

When it came to figuring out art for Evie's room (remember she requested butterflies?), I knew I wanted to try this great tutorial from Honey and Fitz. I've used oversized acrylic sheets for framing wallpaper before and I loved it, but I really like the look of double-paned acrylic rather than just the one sheet against the wall.

 photo IMG_0570.jpg

I had no idea that you can buy smaller sheets of acrylic at Lowes! Such a helpful tip! I picked up four of these 30x36" sheets for about $20 each and then I got started on the artwork with my girls.

 photo IMG_1243.jpg

I found this butterfly book at an antique book store (it can be found here too).

 photo IMG_8854.jpg

 photo IMG_8852.jpg

 photo IMG_8839.jpg

It has about 50 color plates of butterfly sketches that I referenced to draw random butterflies on two sheets of lilac colored art paper that I cut to be just a few inches shorter than the acrylic sheets.

 photo IMG_1340.jpg

I outlined the sketches in black sharpie and let the girls color them in however they wanted. My two older girls used acrylic paint and Evie went with markers.

 photo IMG_1347.jpg

 photo IMG_1343.jpg

 photo IMG_1350.jpg

After they finished coloring in the butterflies, I mounted the paper to the back acrylic sheet with double-sided tape and then marked where I wanted my screws to go. Then I heated an extra large nail with a long match until it was hot enough to melt the acrylic. This is a much easier way to make holes in the acrylic than screwing with a drill. Acrylic is pretty brittle and can break in the drilling process, but the hot nail is easy and pretty painless!

 photo IMG_1163.jpg

 photo IMG_1391.jpg

Then all you do is thread the holes with a 1/2" long machine screw and a nut to sandwich the two boards together.

 photo IMG_1161.jpg

You can use picture hanging wire wrapped around the screw underneath the nut to hang your new frame.

 photo IMG_1168.jpg

The wire will show a little on the side middle screws, but it's not really noticeable. 

 photo IMG_0549.jpg

I love how this project turned out and the girls really loved working on it with me! :)

 photo IMG_0534.jpg

 photo IMG_0495.jpg

Jumat, 24 Juli 2015

kitchen inspiration


man, inspiration is everywhere these days.  it's almost impossible to make a decision.  every time i'm on pinterest or instagram, i see something that makes me want to change my mind.  for my new kitchen, i'm going white.  my last kitchen was grey and the house before that was greige.  now, i think i'm ready for white.  it's safe....and i need some safety in my life.  but i can't be totally safe (that's boring), the island is going to be a soft gray/ green.  now, i know what you're thinking.  your kitchen doesn't look like these....but i have a lot of faith in some cans of white paint ....so let's just keep our fingers crossed, okay ;)

*sources luxe, bravo, amber interiors, clary pfeiffer, cortney bishopurban electricluxe source

Kamis, 23 Juli 2015

Before and After: Ali's Entry

My sister and her family recently moved into a new home close to ours (!) and we're all so excited about it. The house is a really cool property on a great piece of land. It needs some updating, but everything is in good shape and is totally livable as-is, so Ali and her husband have plans to chip away at projects as time and funds permit. Such a smart approach!

 photo IMG_0792.jpg

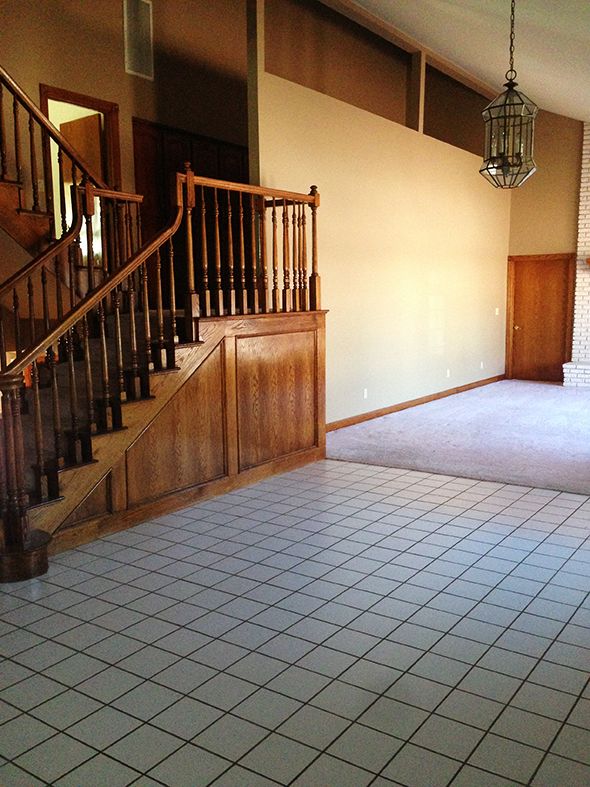
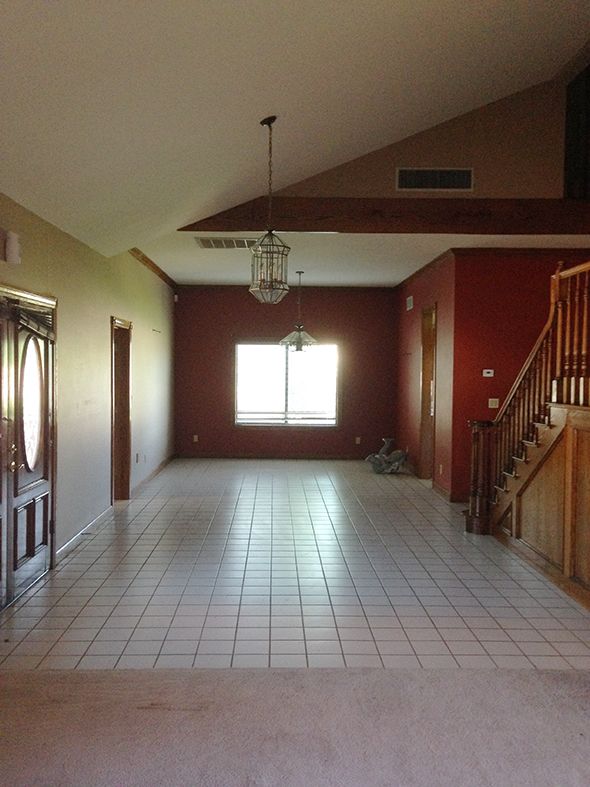
Here is what the house looked like right after they closed. It was dark and outdated for sure, but can't you just see the potential here?!

 photo IMG_0110.jpg

 photo IMG_0101.jpg

 photo IMG_0114.jpg

Decorating a new home or apartment can be so daunting! Where to start when there are so many new spaces fill?! With Ali's new home, she basically needed to find enough furniture to fill a front room, a large foyer and a bigger dining room. She and I were so excited to team up with Target to see what we could do with only a bit of paint, a few thrift store finds and some beautiful Target goodies over the course of a weekend.

Here's what we came up with along with some of my best tips for decorating new spaces on a budget:

 photo IMG_0773.jpg

 photo IMG_0639.jpg

 photo IMG_0824.jpg

 photo IMG_0878.jpg

 photo IMG_0834.jpg

 photo IMG_0879.jpg

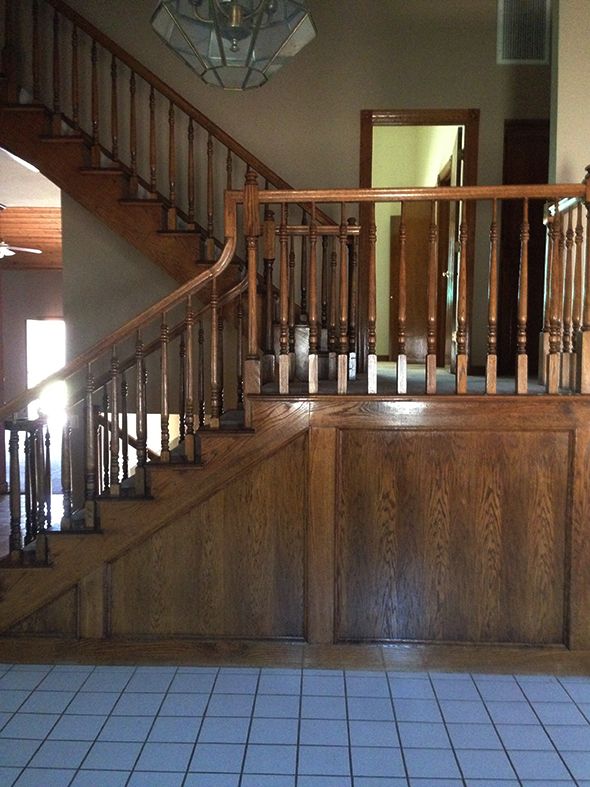
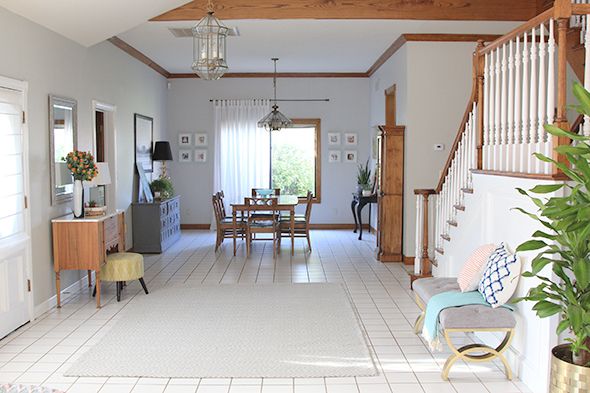
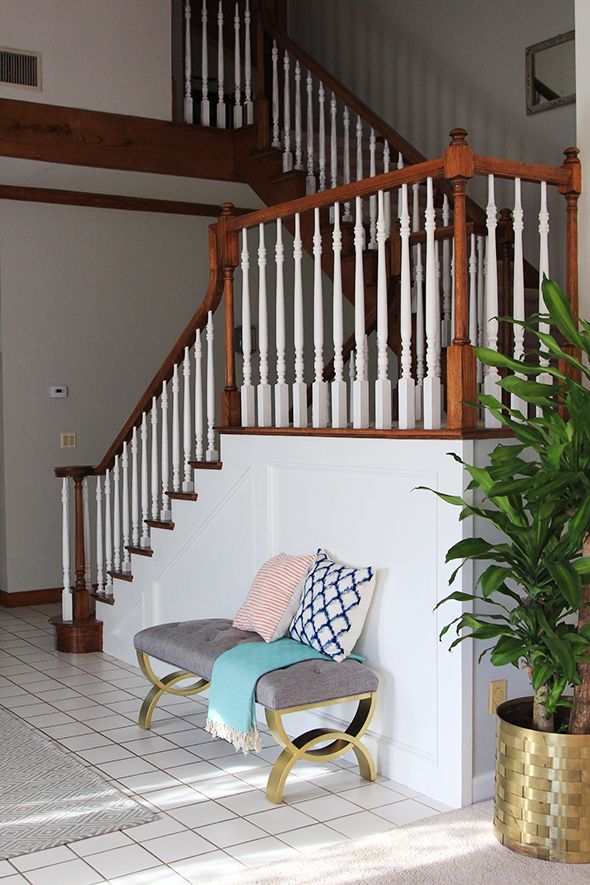
1) Keep walls and trim neutral and accessories colorful

Ali and her husband will be replacing their flooring sometime soon, but we thought it would be worth it in the meantime to paint the stained wood floorboards and stairs. Isn't it scary to paint over wood? That first brush stroke can be terrifying, but what a difference white paint can make! We haven't finish all of the downstairs yet, but everything feels so new and fresh already! The beautiful Gray Owl wall color is perfect in this space too. I love it.

 photo IMG_0689.jpg

2) Cheery new pillows help freshen up the look of vintage furniture

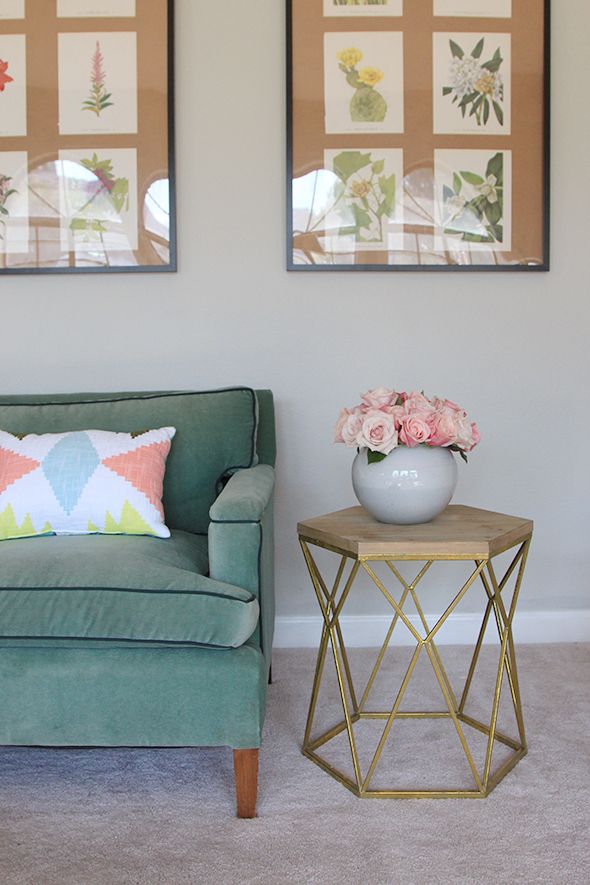
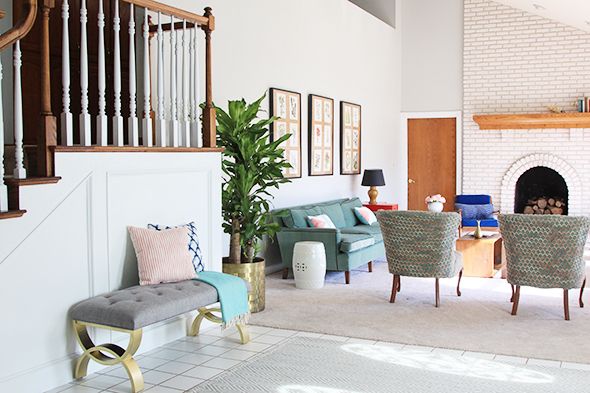
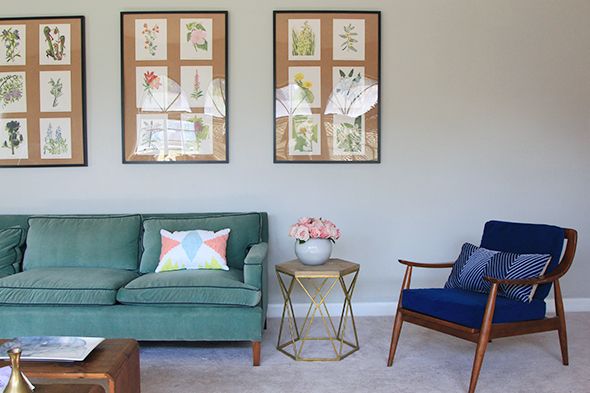
We tried to make big statements with the new and thrifted furniture pieces we bought. Ali found a pair of slipper chairs at a thrift store that she would like to eventually recover, but the colors in the existing fabric look so pretty in the room now! All the chairs needed was a good steam clean. I think they look great with my old green velvet Baker sofa, which I was happy to share since we weren't using it.

 photo IMG_0621.jpg

We picked up a pair of the cool geo print bolsters at Target to go on the Baker. And that navy chevron pillow goes in the Target hall of fame for me! They are on clearance right now and I want to go around and buy them up to hoard them for future clients. They look so good in any room! 

 photo IMG_0656.jpg

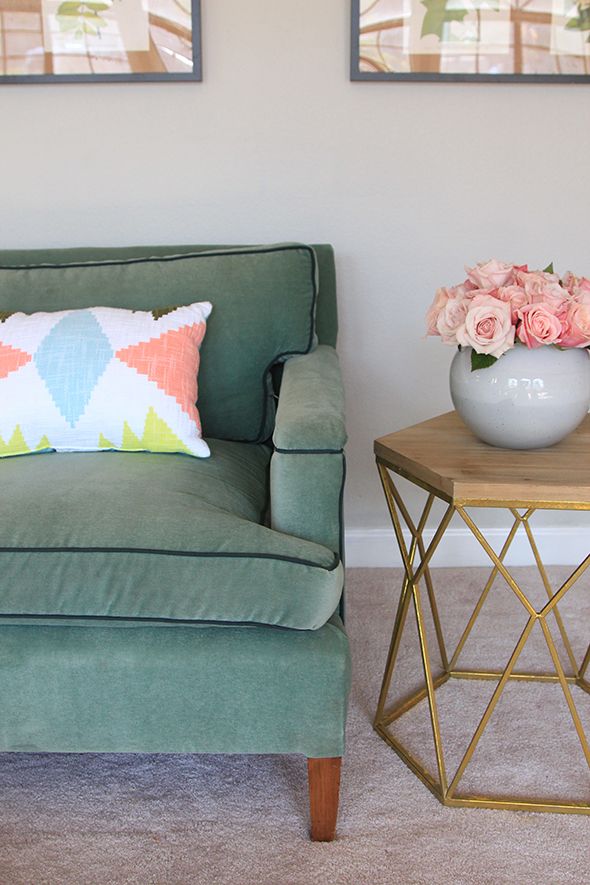
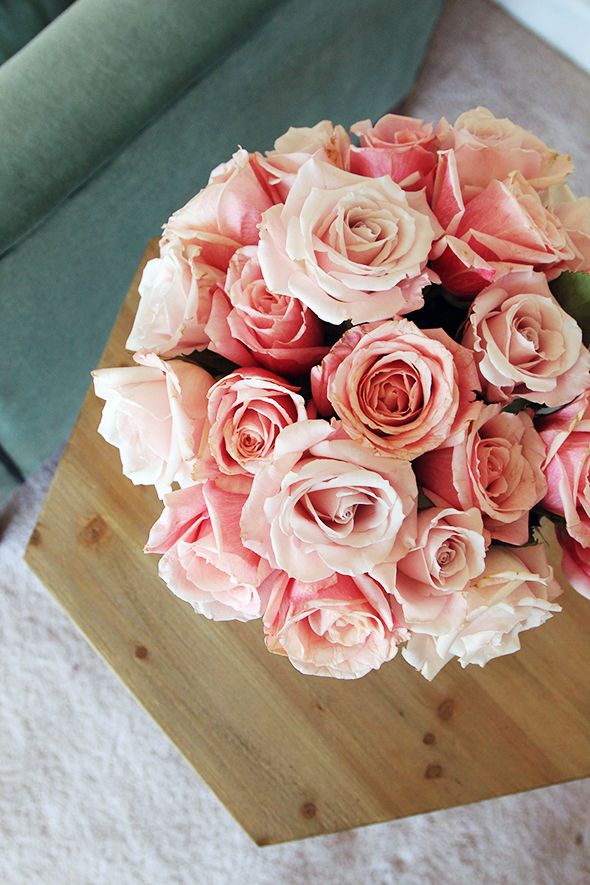
3) Cocktail tables are like jewelry for a living room! 

Ali and I about died when we first saw this little gold-leafed side table. Not only is it the perfect size (not too big or bulky, but not ridiculously small), the gray stain on the wood top is beautiful and right on-trend! It looks like we could have dropped hundreds on just this one piece. It has quickly become another favorite-of-the-year find from Target. They have so many great side tables right now though. (That copper drum one? So cool.) 

 photo IMG_0647.jpg

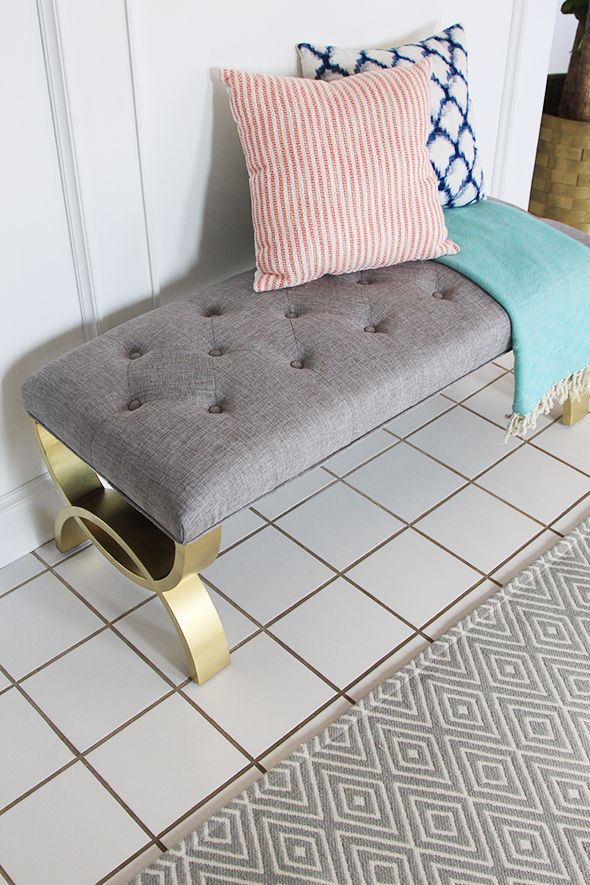
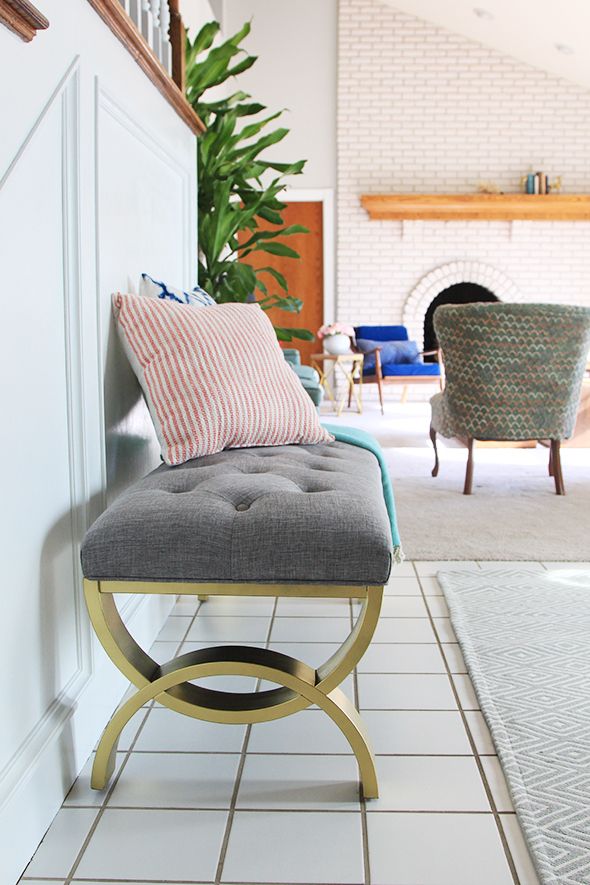
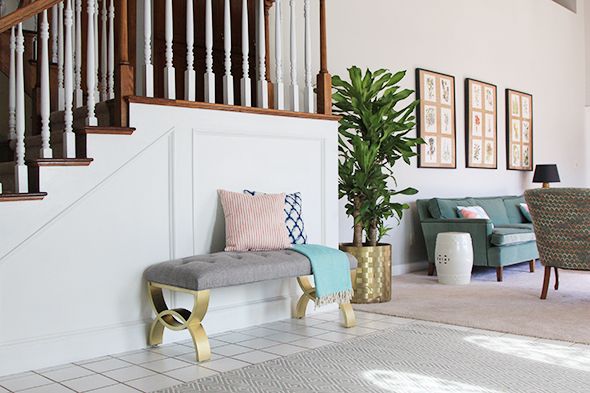
4) Put your new furniture front and center

Since it's the first thing you see when you walk in the door, we really wanted to add a statement bench to the entry area and this one fit the space and style of the room perfectly! We painted the curved arch legs to shake things up a bit and I'm really liking it! I especially love the pretty gray linen fabric.


 photo IMG_0712.jpg

5) Hide the less-than-perfect aspects of the space with beautiful top-layer accessories

We picked up one of these 7x10 indoor/outdoor rugs to cover up as much of the tile as possible in the huge entry and to add a little color and texture to the space. And Ali's giant tree and thrifted brass planter are doing wonders for the room! I feel like plants and greenery instantly make a room feel alive and more finished. Major bang for your buck there!

 photo IMG_0679.jpg

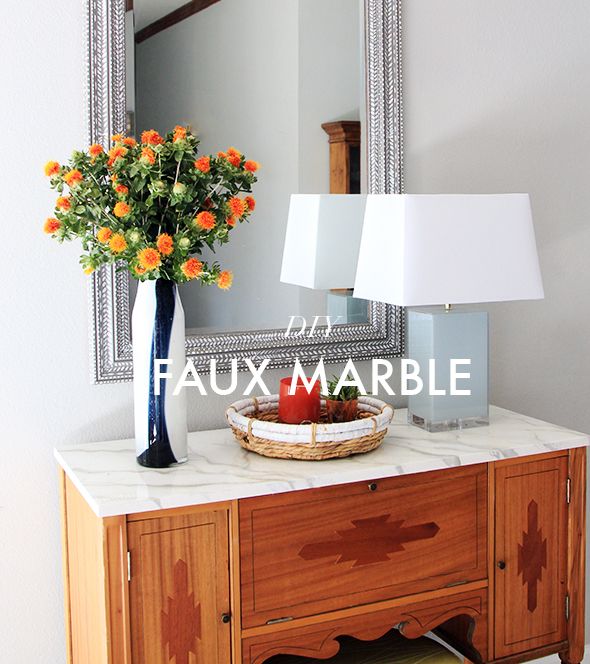
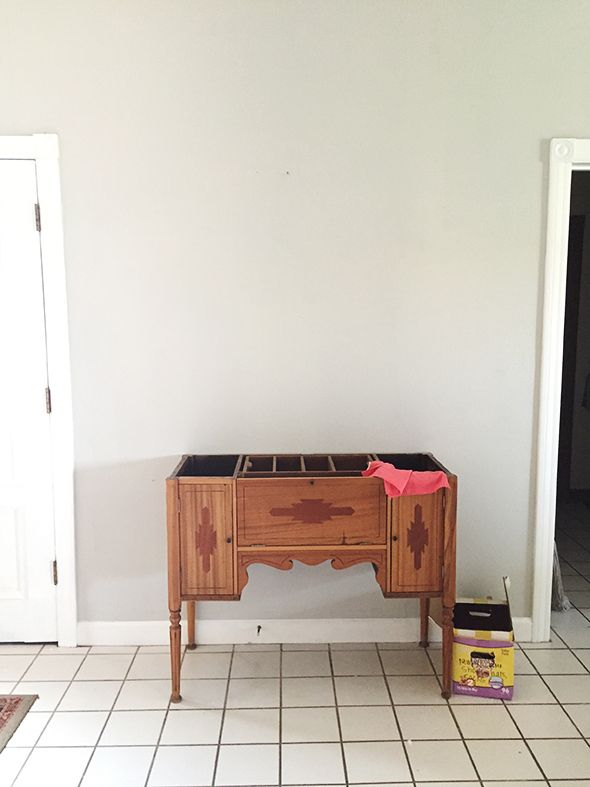
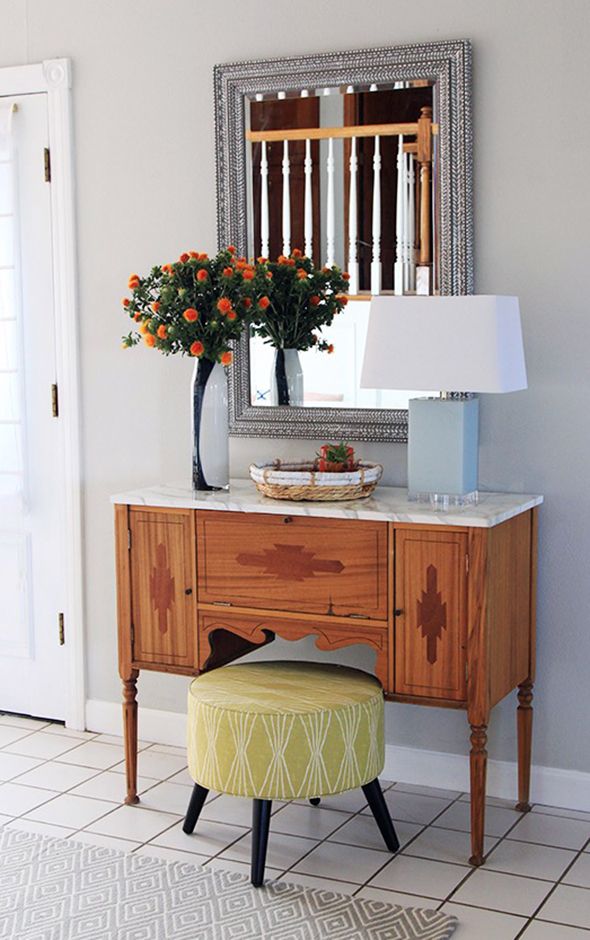
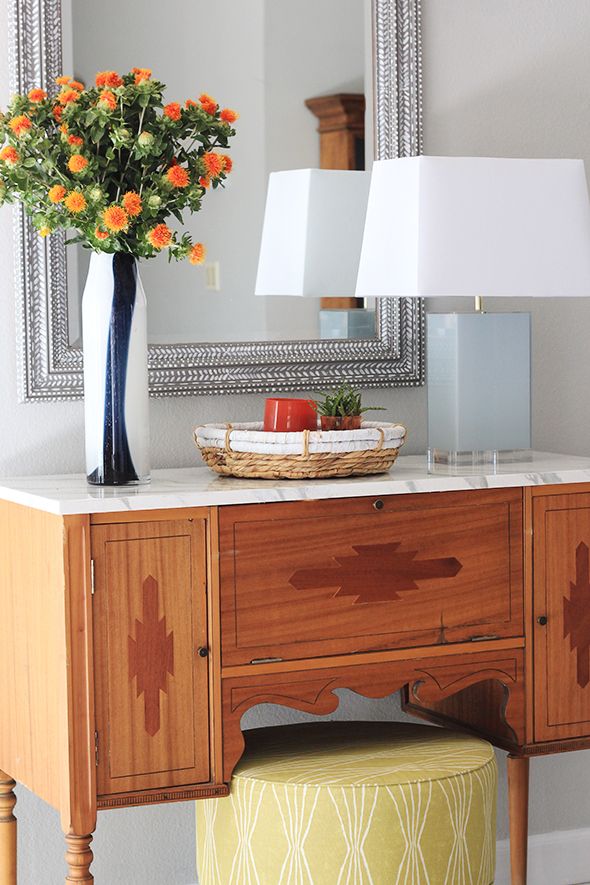
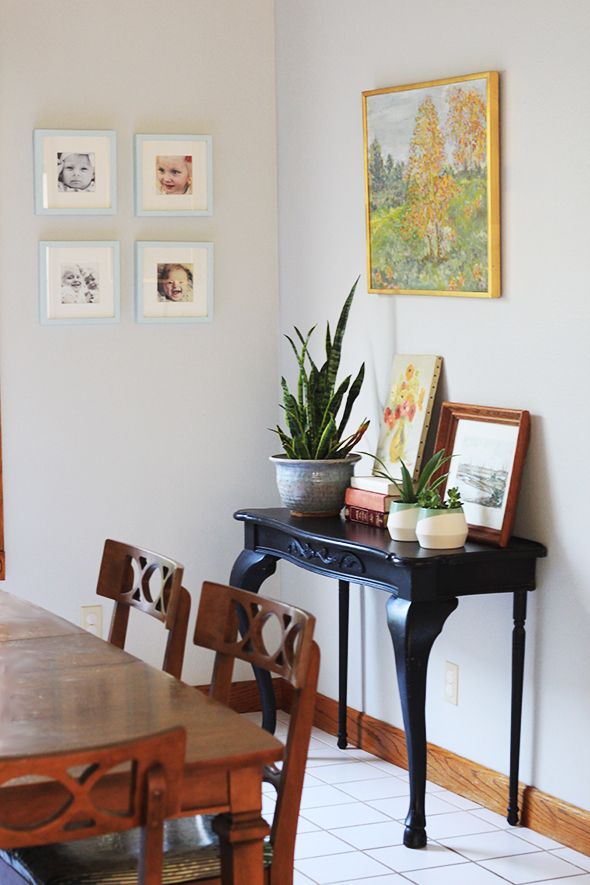
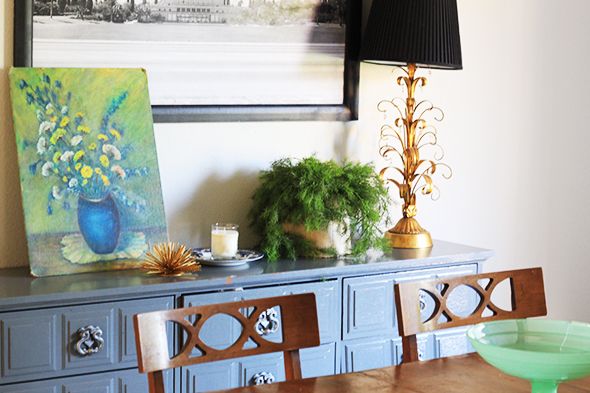
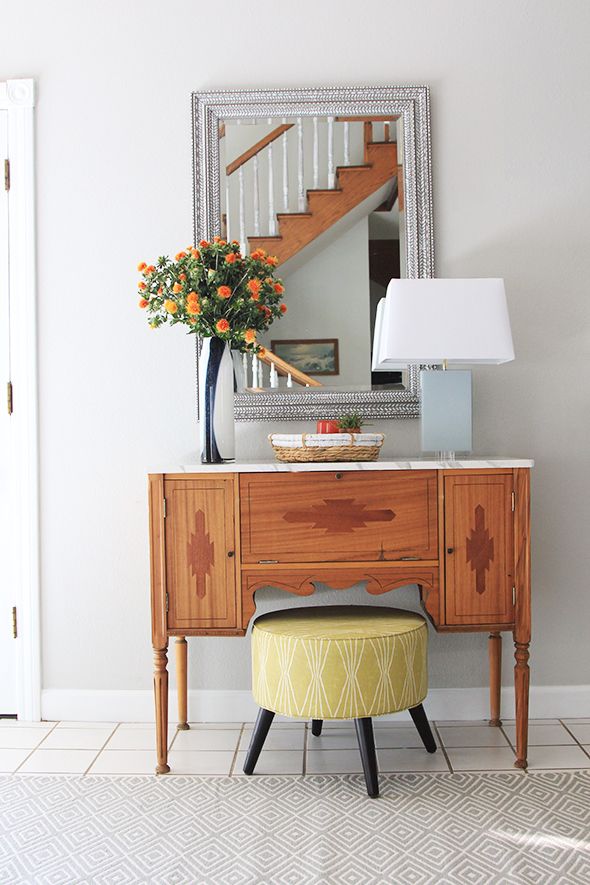
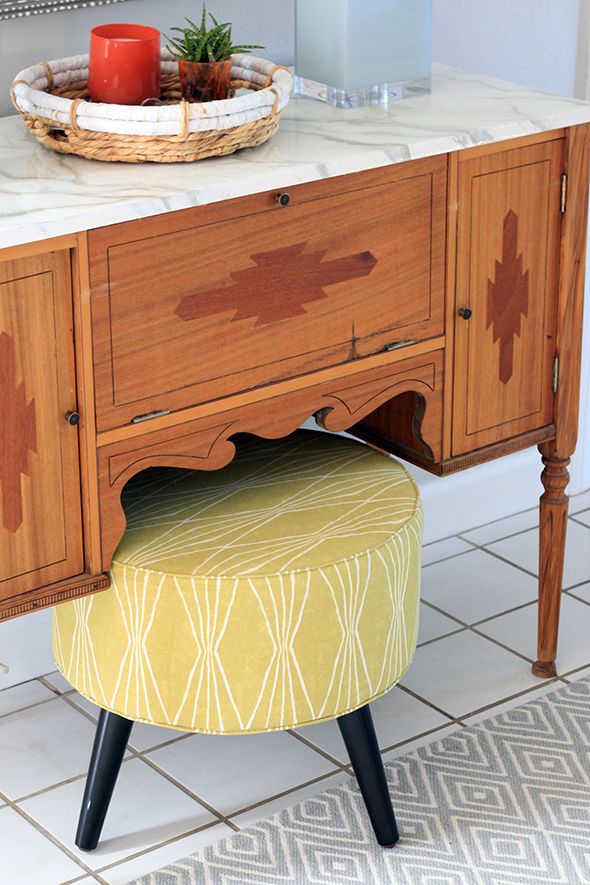
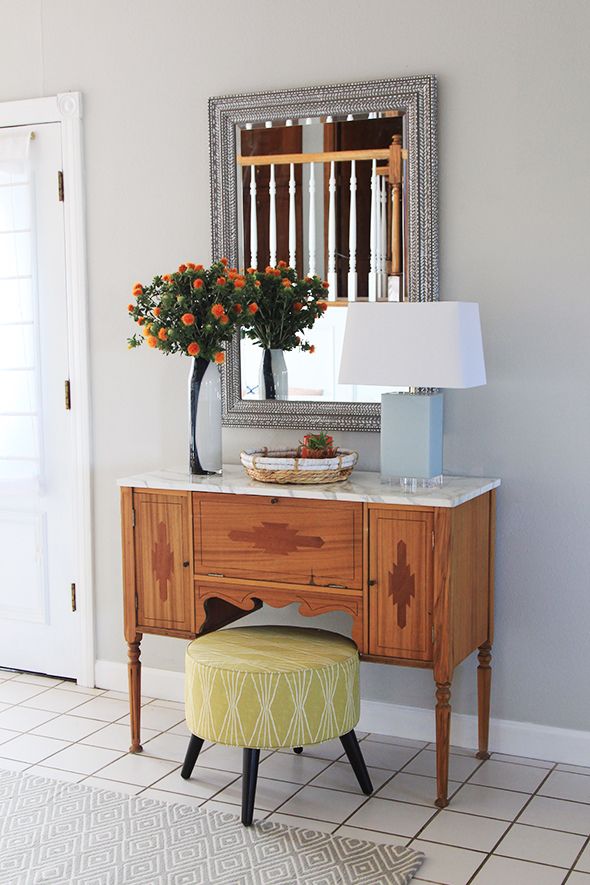
Just to the right of the front door, we put a thrifted console table layered with this cute little ottoman. I love the natural wood next to the bright chartreuse color of the fabric!

 photo IMG_0717.jpg

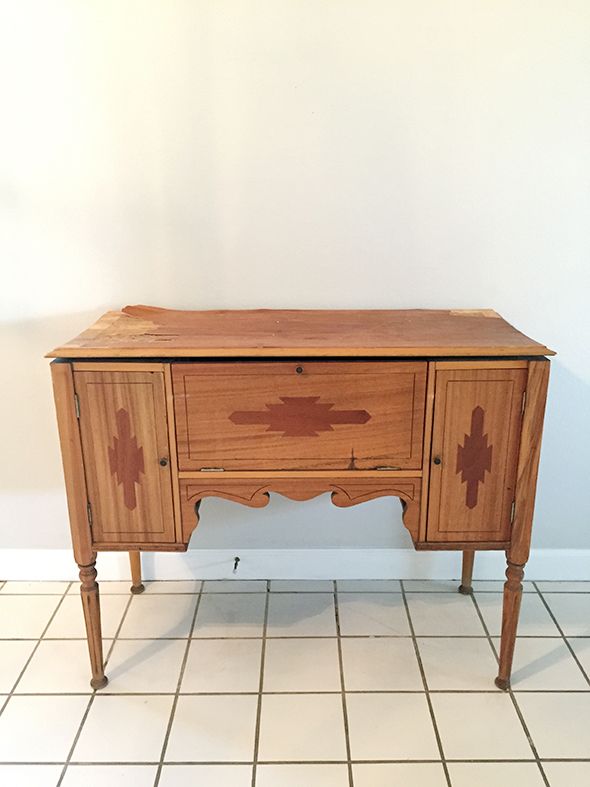
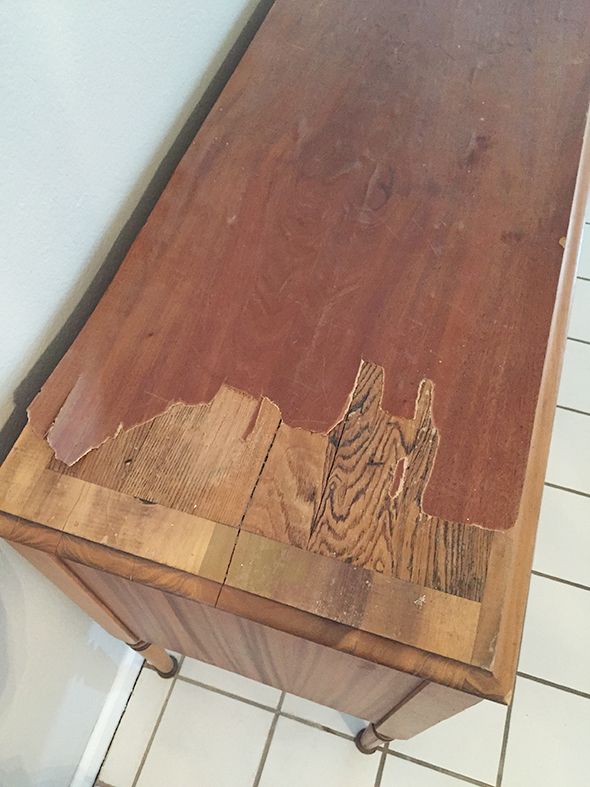
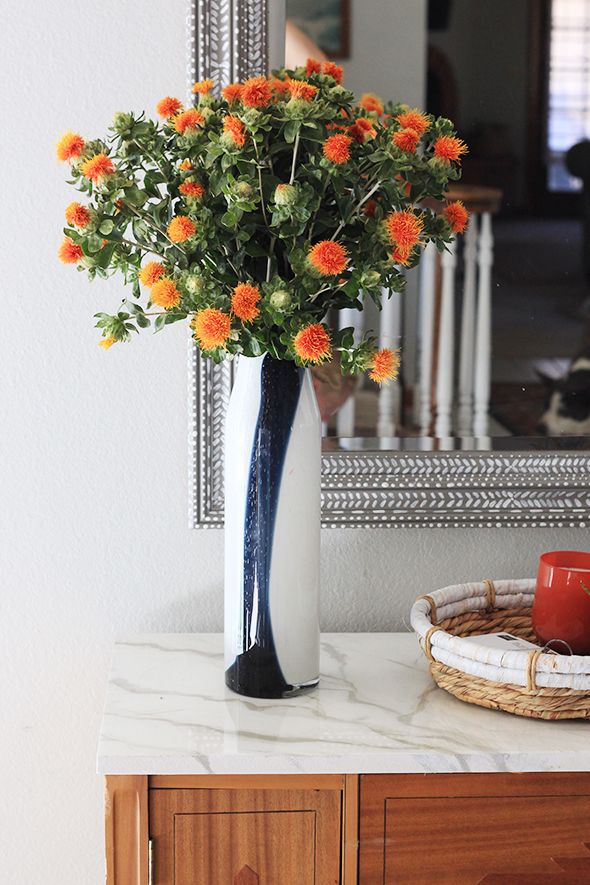
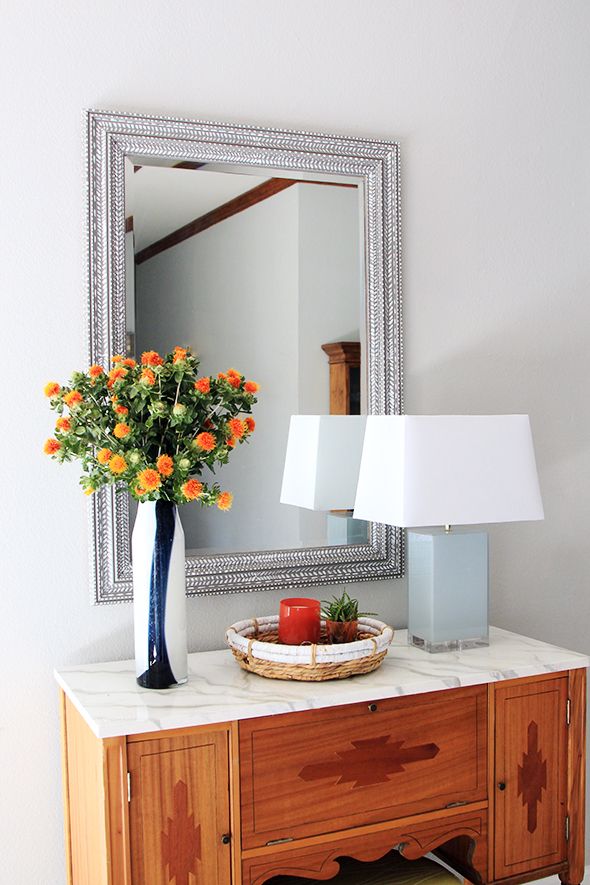
I need to show you some before photos of this console table - it's come a long way, but it was practically free and we loved the inlay design on the door fronts.
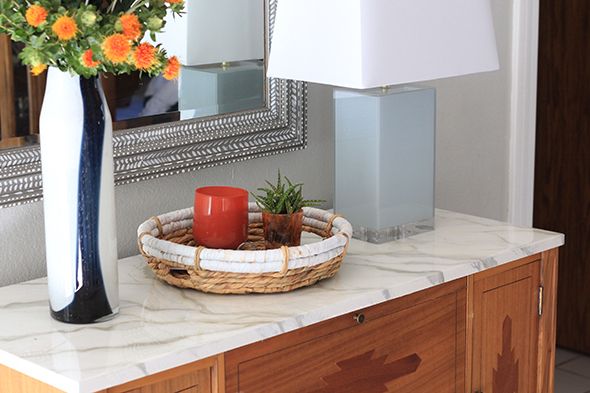
 photo IMG_0755.jpg

The enameled glass lamp and square shade are both from design-genius Nate Berkus. I really, really love the soft blue color! I'd love to pick up a pair of these lamps for my guest bedroom.
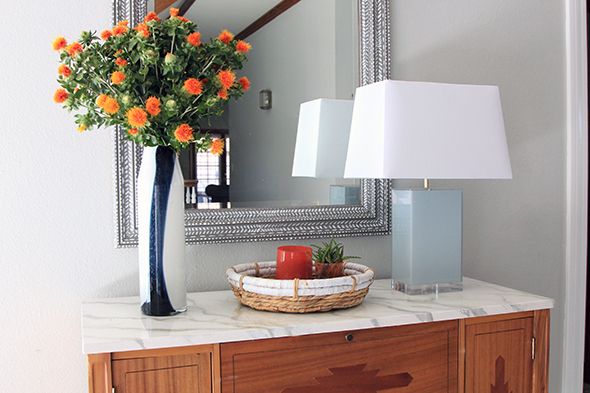
 photo IMG_0741.jpg

The water hyacinth tray is a great size for our console and is the perfect place to coral mail and keys. The mirror came with the house and was really nothing special until we painted it gray and added little dots and dashes on the moulding to give the frame an inlaid look. I love the new texture here!

 photo IMG_0886.jpg

 photo IMG_0878.jpg

There is something SO satisfying about a weekend makeover! We didn't spend a ton of money on this quickie decorating job, but I think Ali's new home looks like a million bucks! It was so fun to see the space transform before our eyes!

PS Victoria over at SF Girl by Bay threw the most gorgeous house warming party and shared her photos and tips here! Check it out!


This post is brought to you by Target Style. Shop the new Home collection in stores and online.